Automating NSX Segment Migration with PowerShell
A set of three PowerShell scripts to export, import, and clean up NSX segments
and segment profiles across any NSX environment — compatible with NSX 4.x and 9.x.
GitHub: https://github.com/pauldiee/nsx-segment-migration
Introduction
Migrating NSX segments between environments is one of those tasks that sounds
straightforward until you are actually doing it. Move a handful of segments by
hand and you quickly run into a chain of dependencies: the segment references a
custom IP Discovery profile, the profile needs to exist on the target before the
segment does, and the binding map that connects them is stored as a separate child
resource that the UI does not always make obvious.
Do this for ten or twenty segments across two NSX versions and it becomes a real
problem.
This post walks through a set of three PowerShell scripts I built to automate the
entire workflow. They cover export, import, and cleanup, and they work against both
NSX 4.x and NSX 9.x without modification.
Why Not Just Use the NSX UI?
The NSX manager UI works well for individual objects, but it has real limitations
when moving a batch of segments:
- There is no bulk export or import for segments.
- Profile bindings are not visible on the segment detail screen in a way that makes
them easy to recreate. - Renaming objects during migration requires editing each one manually.
- There is no way to preview what will be created before committing.
The scripts below address all of these by working directly against the NSX Policy
REST API.
How the Scripts Fit Together
The three scripts form a toolkit designed to be used in sequence for migration, or
independently for day-to-day management:
Export-NSXSegments.ps1
Reads segments, profiles, and binding maps from the source NSX and writes a
JSON + CSV file pair.
Import-NSXSegments.ps1
Reads the JSON + CSV pair and PATCHes all objects into the target NSX, handling
renames, transport zone overrides, and overlay segment validation.
Remove-NSXSegments.ps1
Interactive cleanup tool. Select segments and/or profiles to delete, with a
typed YES confirmation gate.
All three scripts are compatible with NSX 4.x and NSX 9.x. NSX 4.x stores segment
profiles under /infra/segment-profiles// while NSX 9.x uses the flat path
/infra//. The scripts try both and use whichever responds.
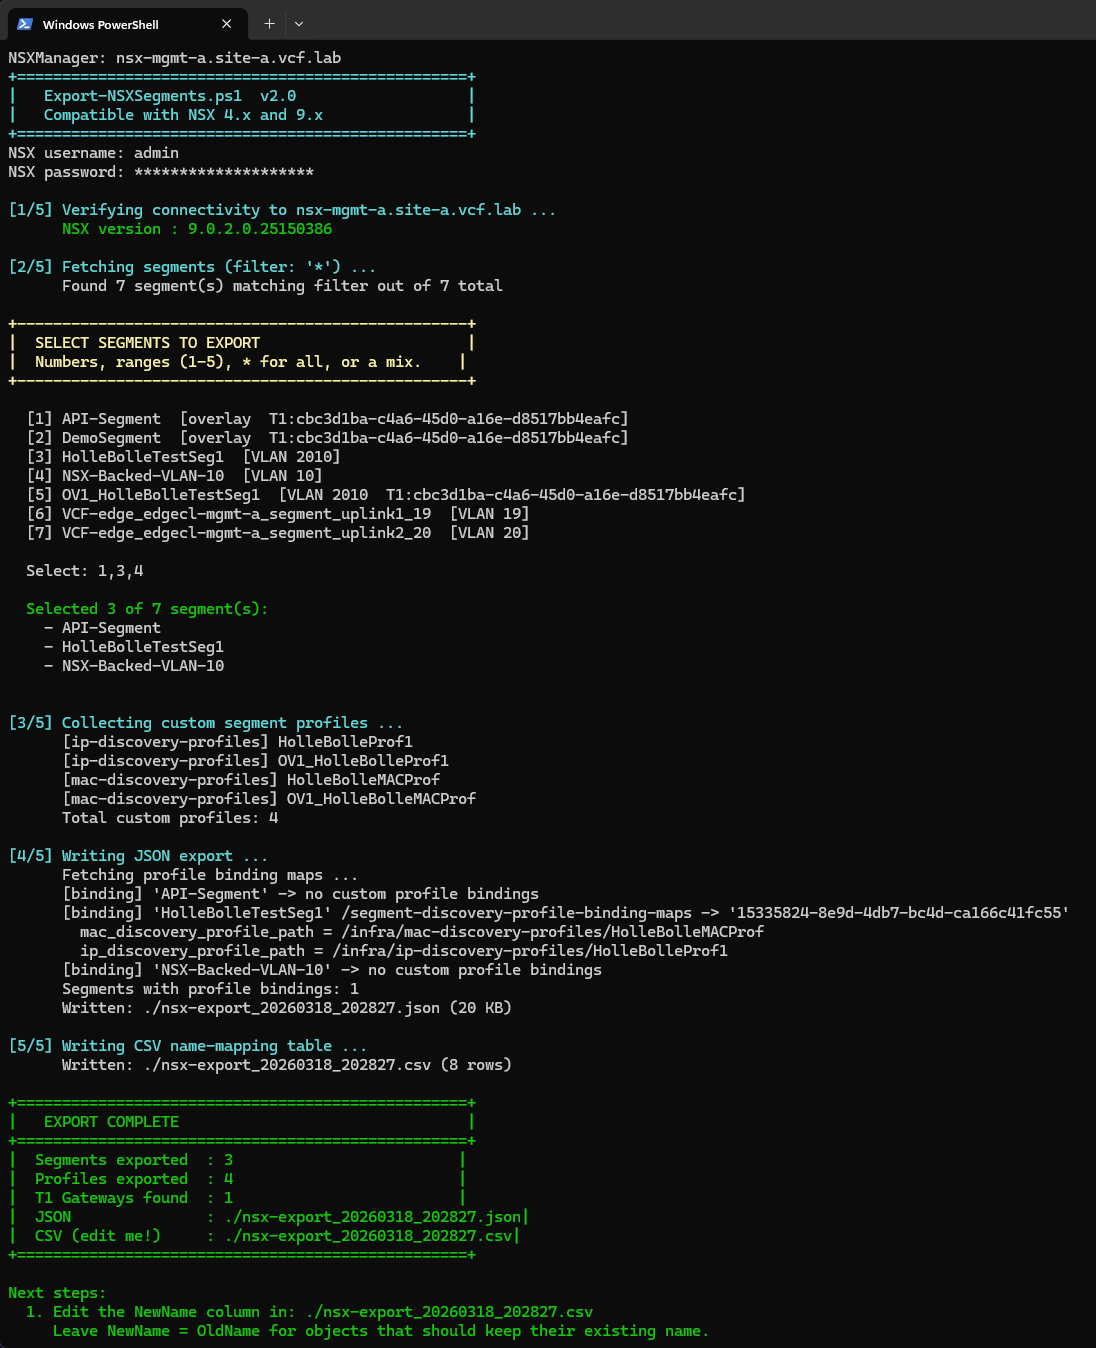
Export-NSXSegments.ps1
The export script connects to the source NSX, fetches all segments and custom
profiles, and writes two files: a JSON file containing all the raw object data, and
a CSV name-mapping table you can edit before importing.
What It Exports
- All segments matching the optional -SegmentFilter wildcard
- All custom segment profiles (QoS, SpoofGuard, IP Discovery, MAC Discovery,
Segment Security) - Profile binding maps for each segment across all three typed binding map endpoints:
segment-discovery-profile-binding-maps (IP Discovery, MAC Discovery)
segment-security-profile-binding-maps (Segment Security, SpoofGuard)
segment-qos-profile-binding-maps (QoS)
The Selection Menu
After connecting, the script presents an interactive numbered list of all matching
segments. You can select individual numbers, ranges, a mix, or * for all:
[1] prod-web-01   [overlay  T1:nsx-t1-prod]
[2] prod-web-02   [overlay  T1:nsx-t1-prod]
[3] test-vlan10   [VLAN 10]
[4] test-vlan20   [VLAN 20]

Select: 1-2,4
Output Files
.json Full object data consumed by the import script.
Do not edit this file directly.
.csv Name-mapping table. Edit the NewName column for any object
you want renamed on the target NSX. Leave unchanged to keep
the same name.
Basic Usage
# Export all segments
.\Export-NSXSegments.ps1 -NSXManager nsx-source.corp.local -SkipCertCheck

# Export only segments matching a filter
.\Export-NSXSegments.ps1 -NSXManager nsx-source.corp.local `
    -SegmentFilter "prod-*" `
    -OutputBase ./exports/prod-migration `
    -SkipCertCheck

# Use a saved credential
$cred = Import-Clixml "$env:USERPROFILE\nsx-cred.xml"
.\Export-NSXSegments.ps1 -NSXManager nsx-source.corp.local -Credential $cred -SkipCertCheck
Editing the CSV Before Importing
The CSV is the bridge between export and import. Open it in Excel or any text
editor. There are three row types:
Segment
Controls the segment display_name and id on the target NSX.
Edit NewName when you want the segment to have a different name after import.
SegmentProfile
Controls the profile name. All binding map paths are updated automatically
to match.
Edit NewName when the profile should have a different name on the target.
T1Gateway
Controls the T1 gateway id referenced in connectivity_path.
Edit NewName when the T1 gateway has a different id on the target NSX.
Rows where NewName equals OldName, or where NewName is blank, are treated as no-op.
You only need to edit the rows where something should change.
Import-NSXSegments.ps1
The import script reads the JSON and CSV pair and PATCHes everything into the target
NSX in the correct dependency order. Profiles are created first so segments can
reference them, and binding maps are applied last after the segment itself exists.
Import Order
- Custom segment profiles — all profiles from the export, not just those
referenced by selected segments - Segments — only the ones you selected in the menu
- Profile binding maps — applied per-segment immediately after each segment
is created
Profiles are always imported regardless of segment selection because PATCH is
idempotent — re-creating an existing profile is harmless — and it guarantees no
segment ever references a missing profile.
Transport Zone Selection
After connecting to the target NSX the script fetches all available transport zones
and presents a menu. All TZ types are shown — VLAN-backed and overlay-backed — and
the selected TZ is applied to every imported segment:
+--------------------------------------------------+
|  SELECT TARGET TRANSPORT ZONE                    |
|  Applied to all imported segments.               |
|  Press Enter to keep the TZ from the export.    |
+--------------------------------------------------+

  [1] nsx-overlay-tz  [OVERLAY_BACKED]
  [2] nsx-vlan-tz     [VLAN_BACKED]

  Select (or Enter to keep existing): 1
Press Enter to skip the override and keep the transport zone recorded in the export
file. Supplying -TransportZoneId on the command line skips the menu entirely, which
is useful for automated runs.
Overlay Segment Validation
If the selected transport zone is OVERLAY_BACKED, the script checks each selected
segment for the two fields NSX requires before anything is imported:
connectivity_path — the T0 or T1 gateway connection
subnets — gateway IP and prefix, e.g. 192.168.10.1/24
If either is missing, you are prompted to supply it interactively. A numbered list
of available gateways on the target NSX is shown. Pressing Enter at either prompt
skips that field. VLAN-backed segments skip this step entirely.
--- Overlay config: 'prod-web-01' ---
Gateway : not set

Available gateways:
  [1] [T0] nsx-t0-edge
  [2] [T1] nsx-t1-prod
  [Enter] Leave unconnected

Gateway for 'prod-web-01': 2
Gateway set: nsx-t1-prod

Subnet  : not set
Subnet for 'prod-web-01': 192.168.10.1/24
Subnet set: 192.168.10.1/24
Profile Path Remapping
One of the trickier parts of the migration is keeping profile binding maps
consistent after renaming. The script builds a remap table that translates every
*_profile_path value from the source NSX path to the correct target NSX path,
applying any CSV renames in the process:
Applying 1 profile binding(s)
  [REMAP] ip_discovery_profile_path:
          /infra/ip-discovery-profiles/HolleBolleProf1
       -> /infra/ip-discovery-profiles/PROD_IpDiscoveryProf1
  [OK] segment-discovery-profile-binding-maps/15335824-...
WhatIf Support
The import script supports PowerShell’s standard -WhatIf switch. No API calls are
made — the script prints every PATCH it would have executed so you can review the
full migration plan before committing:
.\Import-NSXSegments.ps1 -NSXManager nsx9.corp.local `
    -InputPath ./nsx-export_20260101_120000.json -WhatIf
Basic Usage
# Standard import
.\Import-NSXSegments.ps1 -NSXManager nsx-target.corp.local `
    -InputPath ./nsx-export_20260101_120000.json -SkipCertCheck

# Override transport zone on the command line (skips the menu)
.\Import-NSXSegments.ps1 -NSXManager nsx-target.corp.local `
    -InputPath ./exports/prod-migration.json `
    -TransportZoneId tz-overlay-prod `
    -SkipCertCheck
Remove-NSXSegments.ps1
The remove script handles cleanup. It presents independent selection menus for
segments and profiles, checks for attached ports before prompting for confirmation,
and handles binding map removal automatically before deleting each segment.
Deletion Order
The deletion sequence is important and enforced automatically:
- Profile binding maps are removed from each segment silently before the segment
DELETE is issued. NSX rejects segment deletion while binding maps still exist. - Segments are deleted next.
- Profiles are deleted last. NSX rejects profile deletion while any segment still
references it.
Safety Features
- Independent menus — pressing Enter at the segment menu skips segments entirely and
goes straight to the profile menu. You can delete only profiles, only segments, or
both in one run. - Port check — before the confirmation prompt the script checks each selected segment
for attached ports. Segments with ports are flagged with a warning because NSX will
reject their deletion until all ports are removed. - Typed confirmation — you must type YES (case-sensitive) before any DELETE call is
made. Anything else aborts cleanly. - -WhatIf support — the full deletion plan is printed without executing any API calls.
Basic Usage
# Interactive cleanup
.\Remove-NSXSegments.ps1 -NSXManager nsx.corp.local -SkipCertCheck

# Pre-filter the segment list before the menu appears
.\Remove-NSXSegments.ps1 -NSXManager nsx.corp.local `
    -SegmentFilter "test-*" -SkipCertCheck

# Dry run
.\Remove-NSXSegments.ps1 -NSXManager nsx.corp.local -SkipCertCheck -WhatIf
Saving Credentials
All three scripts accept a -Credential parameter. If omitted you are prompted each
run. To avoid repeated prompts, save your credential once using Export-Clixml:
# Save once
Get-Credential | Export-Clixml -Path "$env:USERPROFILE\nsx-cred.xml"

# Use in any of the three scripts
$cred = Import-Clixml -Path "$env:USERPROFILE\nsx-cred.xml"

.\Export-NSXSegments.ps1 -NSXManager nsx-source.corp.local -Credential $cred -SkipCertCheck
.\Import-NSXSegments.ps1 -NSXManager nsx-target.corp.local -Credential $cred `
    -InputPath ./nsx-export_20260101_120000.json -SkipCertCheck
.\Remove-NSXSegments.ps1 -NSXManager nsx.corp.local -Credential $cred -SkipCertCheck
The XML file is encrypted with Windows DPAPI and can only be decrypted by your user
account on the same machine. If you change your NSX password, re-run the
Get-Credential | Export-Clixml line to overwrite it.
A Note on Certificates
All three scripts include a -SkipCertCheck switch. This works for self-signed
certificates, but if your NSX uses a certificate signed by your own internal CA you
may still see validation errors. The issue is not that the certificate is untrusted
— it is that Windows cannot build a chain to a known root CA.
The proper fix is to import your CA certificate into the Windows Trusted Root store
on the machine running the scripts:
Import-Certificate -FilePath "your-internal-ca.cer" `
    -CertStoreLocation Cert:\LocalMachine\Root
Once your CA is trusted, all certificates it has signed are automatically trusted on
that machine and -SkipCertCheck becomes unnecessary.
Full Migration Walkthrough
Putting it all together, a typical migration from source to target looks like this:
Step 1 — Export from source
$cred = Import-Clixml "$env:USERPROFILE\nsx-cred.xml"

.\Export-NSXSegments.ps1 `
    -NSXManager nsx-source.corp.local `
    -Credential $cred `
    -OutputBase ./exports/migration-$(Get-Date -Format yyyyMMdd) `
    -SkipCertCheck
Step 2 — Edit the CSV
Open the generated CSV file. Review the NewName column for each row. Edit any names
that should be different on the target NSX. Pay particular attention to the
T1Gateway rows if your target NSX has different gateway IDs.
Step 3 — Dry run on target
.\Import-NSXSegments.ps1 `
    -NSXManager nsx-target.corp.local `
    -Credential $cred `
    -InputPath ./exports/migration-20260101.json `
    -SkipCertCheck `
    -WhatIf
Step 4 — Import
.\Import-NSXSegments.ps1 `
    -NSXManager nsx-target.corp.local `
    -Credential $cred `
    -InputPath ./exports/migration-20260101.json `
    -SkipCertCheck
The script will prompt you to select segments, choose a transport zone, and (if
overlay) fill in any missing gateway or subnet values.
Step 5 — Clean up source (optional)
.\Remove-NSXSegments.ps1 `
    -NSXManager nsx-source.corp.local `
    -Credential $cred `
    -SegmentFilter "prod-*" `
    -SkipCertCheck
Closing Thoughts
These scripts have saved a significant amount of time on NSX migrations where the
segment count or profile complexity made manual recreation impractical. A few things
worth keeping in mind:
- -WhatIf is your friend. Always do a dry run first, especially in production
environments. - The JSON file is the source of truth. Keep it alongside the CSV so you can re-run
the import if something goes wrong. - PATCH is idempotent. Running the import twice will not create duplicates. If
something fails partway through you can safely re-run. - Profile deletion order matters. Always remove the segments that reference a profile
before attempting to delete the profile itself. The Remove script handles this
automatically.
Download the scripts from GitHub:
https://github.com/pauldiee/nsx-segment-migration
If you run into issues or have suggestions, feel free to leave a comment below


